Showing posts with label refashion. Show all posts

Saturday, July 18, 2015

A Refashion For Me & My Girl

Hello again :) I'm not sure why I'm always so optimistic at the prospect of school holidays potentially equalling extra sewing and blogging time; once again history proves me wrong. Back into term time again, and here I am finally getting back to posting.

To be honest, I wasn't sure whether to record this one - it's almost as basic a refashion as they come! But simple though it was, it's been a success on two fronts, so here 'tis:

Last September a op shop jaunt netted me this spotted rayon dress. It was too big all over, and elastic waists are rarely friendly to me. I think it was also intended for a taller person than me (left) or my daughter (right)


So why buy it? Easy:
a) Having discovered rayon this past year I'm a little bit in love! It breathes and moves like silk and is as cooperative to sew as cotton.
b) It reminded me (albeit as a black and white, ill-fitting version) of the dress Julia Roberts wore for the polo scene in Pretty Woman - don't tell me you didn't love it too...
c) it was $2.

Done deal.

Originally I planned to unpick it and make it up again as the polo dress. There would have been quite a lot of faffing about with the armscyes though - they're very low. So it got pushed down the queue, until it occurred to me that I'd been pinning an awful lot of midi length skirts, and my girl loves to wear slouchy, breezy, layered tops in warm weather....Double win!

The dress was constructed as a separate top and (four panel) skirt, then narrow elastic was sewn to the waist seam. I unpicked this and detached the two.


I far prefer waistbands to elastic waists, especially if I intend to wear tucked in tops. I had a bit of extra length to play with, but wanted to keep it as full as possible. So I cut 6cm from the upper edge of the skirt, which gave me plenty for a waistband. The fact that the skirt was sewn in four panels meant that as a waistband it didn't quite match up neatly as a three piece front and two backs; the "side" seams on the finished band are more towards the front. But it is centred and the print disguises that flaw well.


There wasn't quite enough to cut a facing from the fabric as well, so I had to make do with some black cotton in my scraps stash, but it matches and is on the inside so isn't seen. The main skirt was gathered and then sewn to the new waistband. Then I undid the back centre seam 20cm and inserted a zip.


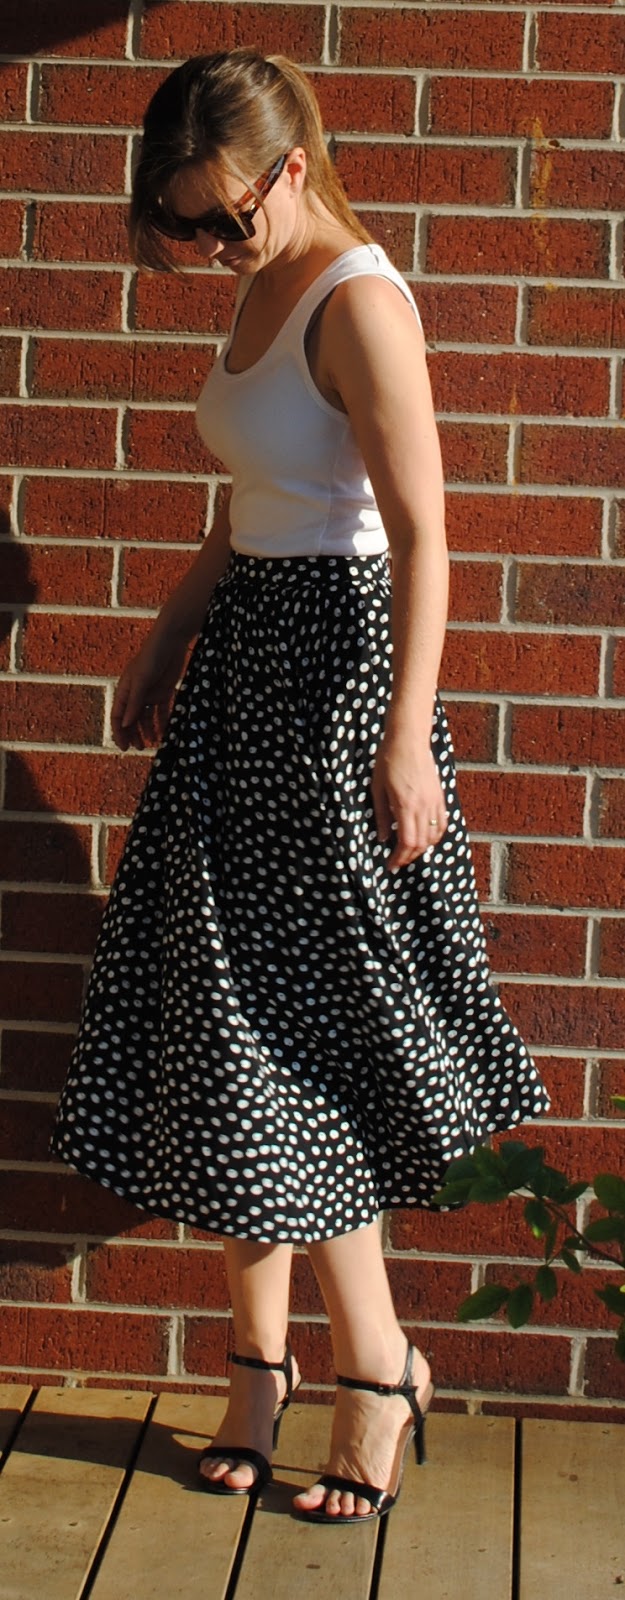
 The end result is swishy and breezy and I love it! And though a summer skirt really, it's done pretty good service in cooler weather too, with a collared shirt, jumper, tights and long boots. (So long as it's not too cold out...)

The top could hardly have been easier! Once the elastic was gone, I just had to press the gathers/wrinkles out and give it a narrow hem.


 Voila! An easy cropped top for layering (since, thank heaven, she's not into the bare midriff look!)
Not much call for sleeveless tops round here at the moment - right now warm weather is a fond and distant memory - but summer's got to return one day....

So pretty basic really, but a fun and satisfying - and quick! - project. I mentioned in my MMM reflections post that I've fallen out of the habit of refashioning; this make(s) has gotten me excited about it again. And I noticed that this year's Refashioners challenge (which by the by looks amazing! The talent - oh my!) is running a community challenge alongside the main one. I think I'll give it a go....

Friday, June 12, 2015

Complete: Damask Jumper

Hello all! Time to start whittling down my sizeable backlog of unblogged projects. I thought I'd start with this jumper, since it got a bit of love during MMM. This is one make I'm really happy with and, incidentally, one that reminds me that the things I make don't have to be perfect to be loved!

One of my goals for 2014 was to try colourwork in knitting. When I went through my knitting inspiration ideas on Pinterest I noticed that most of the colourwork images I'd pinned were only two colours, rather than the multi-coloured fair isle styles. The idea for this jumper came out of that observation. I didn't really want a striped piece this time; I was intrigued by the idea of doing a more "fluid" kind of design. As I thought about patterns in fabric that I like, I wondered whether a damask design would work. Unfortunately I couldn't find any knitting pattern even remotely like what was starting to form in my head.

My daughter has been getting into cross-stitch lately, and it occurred to me that gridded cross-stitch patterns are actually the same format as gridded knitting ones. Googling "repeated damask cross-stitch pattern" yielded me a pattern that I adored - this stylised floral one. I didn't want an all-over pattern, just a feature on the front, preferably with raglan sleeves. (Aside: I can't believe how hard it was to find a simple crew neck, raglan sleeved jumper with no side shaping! Every designer seems to want to put some twist on the basics...)

Anyhow, here's the end result:


And an close-up shot of the front:

 
The yarn is Cascade Heritage Silk (fingering weight), which I already had loads of after I unravelled my Still Light horror. (So this is technically a refashion!) I was able to get a skein of the same in black to do the colourwork in. I debated doing the ribbed hems in black also, but decided to keep it just to the damask in the end.


The yarn knits up into quite a drapey fabric, which I'd forgotten, but since I wanted a looser fit anyway that was fine. Here's one thing I learned - after I'd done one sleeve. If you're reusing yarn you've unravelled from a previous project, it knits up much more nicely if it's first wound into a skein, soaked and dried, then rewound into a ball; that gets rid of all the crimping. Thus one sleeve here is noticeably neater than the other.

The cross stitch pattern worked just as well as I hoped, although there was a lot of working out how to centre it and where to start the pattern before knitting began. And the front was assuredly not TV knitting! Silence and solitude were the bywords here. Painstaking note-taking was also vital, so as not to forget where I was up to...

 
The pattern I ended up using was the Simple All Age Raglan Sweater by Elizabeth Lowick, which is a useful one to have, accommodating 15 sizes (really!) from 24" up to a 66" chest. This had the straight sides (didn't want to have to worry about shaping as well as the colourwork...) and raglan lines that I was after. This polo neck I thought would be an easy modification to a crew one - just don't knit as much. Although I wasn't as happy with the sleeves. I'm not nearly as confident changing knitting patterns as I am sewing ones, so even when I found that the sleeve increases seemed to be happening very quickly, I wasn't sure whether I should adjust them or trust the pattern. As it turned out, I probably should have trusted my gut instinct:
 

The sleeves ended up with a really pronounced angle, and really looked awful on (think chicken wings...). I could have unravelled and started them again, but instead I took a very deep breath - several, actually - and researched steeking. Steeking, in my admittedly limited experience, seems to be used mostly for cardigans knitted in the round (especially ones in a detailed pattern). Once the garment is knitted, a sewing machine is used to sew down either side of where the opening will be and then the garment is cut open between the stitching lines. In theory, the stitching stops any unravelling. In theory...

Someone had written that you can't spell "steek" without "eek!", and that's true enough! I tried the jumper on and pinned the arms to the width I preferred. Then I sewed down that pinned line, first in a straight stitch and then a zigzag to be sure. And then to be surer, I overlocked. It seemed to work ok, but it took a little bit of care to ensure the sleeves didn't stretch and ripple along the seam line. The insides of the sleeves aren't nearly as neat as a tidy mattess stitch would have been, but the jumper is wearable now, and that's the point as far as I'm concerned!

So it's not perfect, but I really do love it. It's a garment that - design-wise at least - came out of my own head and was exactly what I wanted it to be. When I wear it, I'm not only reminded of how satisfying making my own clothes is, but also that I can trust my own instincts when it comes to experimenting. You don't get that with RTW!

What's your most satisfying sewing or knitting experiment? Do share!

Monday, March 3, 2014

A No Sew Refashion

Hello again! First things first - here are the results of the Sew Grateful Week Giveaway:

The winner of the Victoria Blazer pattern is Mary Maryall from Maryall Made.

And the winner of the Swarovski stitch markers is Chrystal McKay from Seams like Chrystal

Congratulations, ladies! May they bring many happy hours of creative satisfaction :) If you can email your postal details to daniellekrivan@gmail.com I'll send your parcels to you asap.

I've got a pretty basic refashion to share this week, with no sewing involved at all. Last year a friend of mine started up as a consultant for a party plan clothing company and I hosted a party to help out. Now, I normally haaaaaaaate these kind of things, and so does every one of the friends I invited (I invited people who were fun and who would still speak to me after receiving said invitation). But to my amazement I ended up with a free pair of jeans out of the deal, because Consultant Friend is a born saleswoman.

They actually fit really well. But they were a pale neon yellow. I make no claim to being a fashionista, so can comfortably say I'm not personally on speaking terms with the whole neon trend at all. And I didn't know you could have pastel neon colour (an oxymoron, surely??), but there you are.


They were quite hard to photograph actually; imagine a bit more fluorescent than that.

Even though it's not a great colour on me, I really do love golden yellow. It'll never be a staple in my palette, but every now and then I like to inject a bit of it in there. And you may remember in my list of goals for this year I mentioned I wanted to start experimenting with natural dyes. So since these were already a light yellow, I thought I might give turmeric a try...

I'd seen a tutorial on using turmeric to dye fabric here. I didn't take photos of the process, but basically:

1. Wash and dry fabric/garment
2. Simmer garment in large pot on the stove top in a mix of four parts water to one part white vinegar. (This acts as a fixative for the dye.)
3. Fill pot with fresh water and add turmeric (I used two 25g packets). Let dye bath simmer for ten minutes then add fabric/garment.
4. Ensure fabric/garment is completely submerged and simmer for 15mins, stirring occasionally.
5. Turn off heat and let garment sit in dye bath until it reaches desired colour (bear in mind it will be lighter once it's dry). I left mine about an hour.
6. Remove from dye bath and rinse until water runs clear.

So how did it work? Well, here's Attempt One:


In parts, they were the exact deep yellow I was hoping for. But I was hoping even more for a solid colour. And that was too streaky a result. Since the colour (in parts!) was what I was after, I wondered if a second attempt would even up the saturation...Below is Attempt Two:


Better, but still streaky. I think possibly a few more dye baths would achieve the solid colour I was after, but I have to confess I caved at this point. :/

 Enter Rit powder dye... I just followed the instructions for dyeing in a bucket or basin (I can't quite bring myself to use the washing machine - I keep imagining the rest of our clothes turning shades of the dye colour forever after...)


Even though I really wanted the natural technique to work, I have to admit I LOVE my new jeans!


Especially with my Rowe top...


So, the evaluation? Turmeric does make an effective fabric dye. But I think it's best kept for deliberate variegated effects like tie dye (which is how the original tutorial used it). And I'd actually really like to try it on spun wool, where a heathery effect looks beautiful. (Incidental Aside: I have attempted spinning! I'm somewhere between Absolute Novice and Extreme Beginner, but I've made a start. And I think I'm going to love it :)  So that's two more 2014 goals underway, hurrah!)

This project got me thinking. I've been really enjoying the Wardrobe Architect series, and think it's a fantastic way to make sewing more efficient, personal and less "hit and miss". Now these jeans only go with about three other things in my wardrobe...but I love them and feel happy every time I wear them. It made me realise that while I love to sew to a plan and genuinely aspire to sewing a complete wardrobe rather than disparate garments, every now and then I should make room for a "just because" kind of project. Just because I love it. Just because it makes me happy. Just because I want to!

How about you? Do you have any stand alone projects like that? Do tell!


Friday, January 31, 2014

Refashion: Part 2 - Dress to Top.

Hello all! Back again with Part 2 of my dress refashion. You may remember from last post that so far from this dress I've gotten a blouse I'm pretty darn happy with:


But I still had all of this left over:


Since I already had a metre of cream rayon in my stash drawer (intended a few months ago for a refashion using By Hand London's Polly top pattern, but it didn't cooperate...), I thought the two might combine nicely to make something a little bit textural.

For Christmas last year I was given a voucher for Style Arc patterns. (insert happy dance here). I decided on the Ziggi jacket, the Camilla blouse, and the Annie Cami:


I remember reading on a blog somewhere - I want to say A Fashionable stitch, but I honestly don't recall - that it's a good idea to build up a stash of basic patterns that you can easily adapt or rework, rather than having hundreds of slightly different versions of essentially the same design. I thought this pattern for a woven tank fit the bill nicely.

There was quite a lot of broderie anglais there, once I'd unpicked the gathering stitches and ironed it flat. I started by marking where the final hem would be on the front piece, and then laid a length of lace across it so that the scalloped edge just overlapped the hemline.


I sewed this down close to the upper edge of the lace, then positioned another length so that it just overlapped the top edge. I sewed this down the same way, then kept layering lace until it covered the front. From the back it looked like this:


I pinned around the edges, sewed close to the edge right around the sides, armholes and neckline and then cut away the excess:


Then I sewed the rest as per instructions; front darts, sides, shoulders. Normally for this pattern I think I'd French seam, but here that would have been too bulky. I didn't have enough rayon over to make bias binding, so just used a polycotton pack that I had. Not lovely, but serviceable! I did find the line of securing stitching I did around the edges showed in places, so I had a little bit of unpicking to do there...


The pattern calls for the side vents to be mitred, which is quite a nice finish (although I'd like to try folding the edges under rather than overlocking next time). I could only do that on the back though;


For the front, I sewed just the hem, not the vertical/side stitching. The lace was already secured to the main fabric at the outer edge of the side vent, so once folded back into the finished position it just needed a few hand stitches to secure it in place.


 I finished up with this:


I'm quite pleased with it! Not too shabby for leftovers, anyhow :)  I don't know why the original lace ruffles made me irritated while these flat lace layers make me happy, but there you are!


It turned out a little boxier in shape than I expected or am used to wearing, but I'm ok with that I think. Since it only has a hook and eye closure at the back of the neck it has to be a loose enough fit so that you can actually get it on. Plus the lace makes it a bit stiffer than it would otherwise be. Next time I use this pattern I might nip in the side seams just a little bit. I think I'll also reshape the back opening to more of a keyhole shape and bind it, because the slit opening tends to sag a little.


 The other main construction change I'd make is to lower the darts. They really are a bit high (which we'll chalk up to nursing three kids...;) ) I think I can get away with it on this top, because the dart itself just catches the outer edge of a lace layer, and then that lace sits over the end of the seam, but I know it's not quite right.


This actually shows up a sewing weakness of mine - I almost always do a muslin, but sometimes it's a bit of a "token" muslin. For this one I really only checked that I could get it on and off... I'm not entirely sure, because the lace adds a fair bit of thickness, but I think it pulls a little across the bust. I've never had to do a FBA - never thought it would remotely be a possibility! - but I may research that for next time too.

This sounds like a bit of a catalogue of flaws so far, but it's really not so bad! It's had its first outing for the day and I was really happy with how it felt on. There's something so summery about broderie anglais, isn't there?

There was one other step I'd planned for this top, but stopped short on, thanks entirely to the Top 5 Reflections exercise. I'd intended to try dip-dyeing this to get an ombre effect (I was thinking coral or maybe aqua) but changed my mind. I realised that although the dye idea would - I think! - look good, it would actually limit how useful this top would be in my wardrobe. As it is it goes with lots of things, so I thought I'd forego a slightly more "impressive" blog post/item in favour of functionality. We're sewing a wardrobe here, after all!

In other news, the lovely Siri from Pinhouse Playmate has nominated me for another Liebster award! If you haven't come across her blog before, make sure you check it out - her sewing is amazing and her knitwear sublime :) Thanks Siri! I'll have a think over my answers and post soon :)

I've almost finished all my planned summer sewing now - just four more items to go :) I'm finding my mind starting to drift though to cooler weather projects, but that could just be the hankering for autumn that I get at this time every year - a kind of "if you build it, they will come" ;)

Do you sew according to a plan? Which do you prefer making - warm or cool weather garments?

Have a wonderful week :)

Danielle oxo

Friday, January 24, 2014

Refashion: Part 1 - Dress to Blouse

I realised the other day it's been aaages since I've done any refashioning, so here's the first refashion project of 2014. The best part was that in the end this dress yielded two garments. Win!


This was passed on to me by my sister, with the tags still on it. I was immediately struck by the lovely print and how beautifully it was made. I hadn't heard of the brand Ti Mo before so I looked it up. Here's an excerpt from the web site, regarding the founder Tine Mollatt:

For Tine truthfulness and honesty are also guiding beacons. She does not believe in exploitation of any kind to reach her goals. Not towards the people involved on the way, nor towards the animals that provide materials or towards mother earth. She believes in sustainability on all levels. She believes the time of mass consumption is soon to be past. She believes in high quality clothing that’s long lasting. She believes there is a right way to approach the calculation of costs, without cutting any corners. She believes in the value that lies within the garment and she believes in the masterful skill that lies in tailoring. 

I thought that was just wonderful, and it's an approach I really want to support. Unfortunately for me:


This is why I don't wear A-line or trapeze style dresses. 

There was plenty of potential though to make it more me-friendly. The three rows of broderie anglais ruffles are sewn to a "skirt" which was attached to the main body. The clever thing about those ruffles was that they gave the hemline enough body to stand out to create the A-line shape; while this doesn't work for me in this particular instance, I'm definitely filing it away in my head as a technique to remember.

My first thought was to make it into a simple blouse by removing the "skirt" (because I know I'll never wear a dress that short), and creating more shape through side shaping and front and back darts. The original dress had a button placket at the back, and I didn't want to change this. Nor did I want it to be so fitted that it required an additional closure. 

First things first: removal of skirt. You can see the A-line shaping pretty clearly here.


Next, I tried it on and marked where the front and back darts needed to be. I also marked where I wanted the sides to be.


After sewing these steps I tried it on. And, well, it was a bit blah...


The more I looked at it, the more I felt it was too "undecided" - too blousey to be a successful fitted top, and not blousey enough to be a proper blouse. Clearly more thought was needed...

Luckily, I still had the skirt. I unpicked all the lace and put that aside. From the bottom edge of the blouse I cut two 2cm strips and one 4cm strip. These were still large loops of fabric, so I cut them down one sewn side. The two 2cm strips I sewed together to make one long one. With a 0.5cm ( 1/4") seam allowance I sewed it into a cord and turned it in the right way. I always forget how long turning cords can take... I folded each edge of the wider strip under 1cm and pressed it flat. They ended up like this:


Then I  trimmed the same amount off the sides of the skirt that I had cut from the sides of the top. Actually, I think I cut all the excess from only one side. Then I sewed the skirt back to the top. Having marked the centre front, I sewed the pressed strip over the fabric join, folding the edges under, to form a casing. You can see where I'm going with this, I'm sure!


Once that was done I just needed to thread the long narrow cord through the casing and tie knots in the ends to keep them from fraying. Voila! A blouse I'm much happier with:


 No extra closures were needed, because it still slips over the head and shoulders easily. The front and back darts which weren't working in the first attempt give the blouse just the right amount of shaping here.  And I love that there was almost no fabric wastage - just the little I trimmed from the sides!


I saw an idea on Carolyn's blog that impressed me; she kept a notebook for a year detailing which handmade items she'd worn each day, so as to have an accurate overview of what actually got worn and how often. She actually drew beautiful "paper dolls" for this; it's a really lovely record! Now I know that if I decided to do something similar it would be a meticulously detailed record... for about one week. Then it would be shoved to the side and forgotten about till the next Top 5 Reflection Lists. But I thought I'd take a slightly more basic approach, because I love the idea. So blutacked to my sewing cupboard is a scrawled list of handmade items and a running tally. This blouse is outstripping the field by three to one already! It's proving to be really versatile - I've even worn it to work in 45 deg heat (that's 113 for farenheit people). I've got cardigans that go with it perfectly too, so I think it'll see me though autumns and springs very comfortably too. I'm really thrilled with this one. :)

Next time, Part 2 of the refashion. After all, I still have all this broderie anglais.... It's the dress that keeps on giving!


What's on your sewing table at the moment?

Have a wonderful week :)

Danielle 

Sunday, August 18, 2013

Refashion: Scarf to Skirt

Hello again! As much as I'm genuinely loving all of our wintry, stormy weather at the moment (truly!), I can't help feeling a little bit excited when I look outside and see definite hints that spring is just around the corner. And that's got me looking at my project queue and rearranging it a little bit - right now I'm wanting to sew up a few transitional garments, rather than strictly cold-weather gear. (Although I think I can just about squeeze in a cosy, long, shawl collared knitted cardigan before the weather really turns...wool is on order!)

With that in mind, I dug out a scarf that was given to me by a friend at work. (Now that people know I sew, I think they're starting to see me as a kind of unofficial op shop...and I have no complaints with that!) I thought I'd taken a before shot, but I can't actually find it, sorry...

It's (or, it was) an Indian cotton rectangular scarf, with a border print running along each edge. Being cream with a black print, I thought it could be paired with cooler or warmer layers fairly easily. By a very happy coincidence, the width of it (plus a very tiny seam allowance) was exactly my hip measurement. Win!


There's no shame in a fourth Ginger skirt is there?! Because that's fast becoming my go to skirt pattern. It's certainly paid for itself, anyhow :). I used this as a base, and made an underskirt of some black voile I had. I cut the ends off of the scarf to the length of the pattern, and created darts at the waistline, leaving the sides straight from the hip point and open from about midway down. (I needed two sets of darts on both the front and back.) This meant the border print was doubled at the side seams, which I liked. The middle piece of the scarf had just enough border print either side to be used as the waistband, which I narrowed to suit.


At this point I had to veer off the pattern: the A-line underskirt sticking out the sides made the scarf look like an apron. Not the look I was going for. So I cut down the sides to be a straight skirt, and squared off the hem also. I left the sides open at the bottom (from memory, about 15cm), which was about half the measurement of the overskirt split. I used an invisible zip on the side seam, so as not to break the pattern on the skirt back. (Back not photographed, but honestly, it pretty much looks exactly the same as the front. Blur your eyes, look at the second photo above and pretend :) )

I'm happy with how this one turned out - it's already done duty as a milder winter skirt (with tights and boots, that is), and I think it'll work equally well with a tank top and sandals in summer. Transitional garment: tick!
I'm not sure how much I would have worn it as a scarf, even though I love the print, because I usually find I look better when I wear a bit more colour near my face. But I think I'll get plenty of wear out of this one :)

Aren't Indian prints wonderful, by the way?? I have an emerald sari I found on ebay in my very small stash that I've wasted far too much perfectly good sewing time just stroking and gazing at it. But I think I've just found the perfect pattern for it, so once spring really kicks in properly, that may need to be the next refashion on the list...

What are you working on the moment? Are you planning for the next season yet, or simply enjoying sewing for this one?

Have a wonderful week :)

Danielle  oxo