Showing posts with label unselfish sewing. Show all posts

Thursday, January 15, 2015

Complete: Kanerva Blouses

Back again, and this time with one of those dream pattern experiences you always kind of secretly hope for but very rarely encounter. Yup, the-no-alterations-needed-great-fit-straight-from-the-pattern experience! 

This is the Named Patterns Kanerva Peplum Blouse, and it's the most amiable, cooperative pattern I've yet come across. I do love Named's overall aesthetic, and I'd admired the lines of this simple blouse when it was first released. It just took me this long to get around to it!

I'd found a lovely soft white spotted Collette Dinnigan silk at Rathdowne Remnants in July, and had intended it for quite another top/tunic pattern. But my experience with making that one up in something else was such an unmitigated misery there was no way I was going to sacrifice this fabric to its vagaries...

I'm so glad I remembered Kanerva! I'm thrilled with how it paired with my special silk...


It's as light as air to wear, and I finally have an inkling of why someone would pay $$$$ for a designer blouse. (Not that it's an option - so glad I can sew!)


There's not much to really say about this one, other than it makes me very, very happy...


I do love the back opening (slightly awkward photo, but never mind), and the way the peplum sits open at the back. Mind you, even though I like the shank buttons I used - very plain, but echoing the tiny printed spot - they do start to be 'noticeable' if I'm sitting with my back against something for any length of time. Perhaps not a blouse for long car trips...


The only modification I made was to shorten the sleeves; I liked the look of them finishing at the waist seam. And, as per my resolution to take my time over projects this year rather than rushing them, I tried finishing them with a band, button and placket. It worked out pretty well, I think; I positioned the opening by copying another RTW blouse. The neckline is finished with bias binding cut from the same fabric, and all the insides are finished with french seams.


I think I'll be enjoying this one for years; the design is really classic and I'm happy with my workmanship on it. I haven't tried yet but I think it'll tuck into a high waisted skirt quite nicely, and since I'll just as happily wear it with jeans and a blazer or cardigan, it looks like it'll be a pretty versatile piece. 

I liked it so much actually, I dug out some rayon I've been hoarding for over a year - waiting for the perfect pattern - that I'd only bought a metre of. Which was not enough for anything much...except a sleeveless Kanerva!


I didn't even need to adjust the armholes; I thought they were fine as is.


This is a kind of rayon I hadn't come across before - it's a crepe kind of texture. It's a bit heavier than the silk above but still falls beautifully, and it feels wonderful to wear.


I'd planned on flat (see? learning from previous one...) silver metal buttons, but couldn't find any that I liked. So I went for plain navy ones, and I think I prefer those actually. It's a busier print than I usually wear, but I was drawn to it in the shop and I'm glad I went with it. Actually, I've noticed I tend towards prints in summer, but not much in winter - I'm more interested in texture when it comes to cool weather clothes.


I've worn this - both of them, actually - quite a bit already. I do love clothes that you can put on and effectively forget about (no fussing or adjusting), and this fits the bill nicely.


I didn't do french seams on this (why do I feel slightly apologetic??), and finished off the armholes with the binding as per the neck. I really do like this as a finishing technique - it makes the insides so pretty :)

I like the look of the peplum-less version of the blouse too, but feel like I'm a bit o-l-d to really carry it off. Perhaps with a high-waisted skirt or trousers with a singlet tucked in underneath (i.e. no midriff skin showing)....I'll give it further thought.

I forgot last time to include my sole effort at 2014 Christmassy gift sewing, so here 'tis:


A little rag doll for my one-year-old niece. This is the Jenny pattern by Pupadou on Etsy. My toy/doll sewing experience is slightly above non-existent, and so I can heartily recommend this pattern as ideal for beginners. It's beautifully drafted and the instructions are very clear. My mum sewed two summer dresses for her (i.e. granddaughter/niece) and gave me the leftovers so I could make up matching ones for the doll. It was a fun project!

But I have to admit, I liked getting back to 'selfish' sewing...


Tuesday, January 7, 2014

Talking Gifts...

Not Christmas gifts - unlike many of you inspirational people out there I didn't make a single Christmas present in 2013. No, these are all December / very late November birthday and birth gifts. And they were a nice way to relax during an extremely busy month!

I haven't had a chance to give most of these out yet, but I'll assume that my nephew and nieces aren't reading this... First up, my version of Eva's Hat by Mary Ann Stephens in Debbie Bliss Baby Cashmerino. My experience of DB patterns has been a bit mixed, but the yarn itself is glorious!


This is knitted in the round from the bottom up, and then stitches are picked up at the hem to knit a contrast band for the inside, which is then sewn down. This helps the hem to sit flat rather than curling up and hides the strands of the colourwork on the inside. Plus it amps up the cozy factor!


This was my first experience in colourwork (other than stripes, that is) and I loved it. I've been wandering around Pinterest and Ravelry and have a few plans for me.... More on that another time though.


Next up, another Hermione Loves Ron in stashed Rowan Bamboo Soft. I've written about this in a previous version here. Love this pattern. My daughter's hoping there's enough stash left for one more...


Slightly more challenging - finding a hat for a fourteen year old boy. Enter Graham, a slouchy beanie in broken rib. It looks a bit odd lying flat - no hanger appeal there - so I got my boy to try it on for the camera.


It got a thumbs up from him and my twelve-nearly-thirteen year old girl, so I figure I'm on the right track :) Good pattern - AND (drumroll, please) I knit a gauge swatch! Giant leap forward in personal growth, that. I used Cleckheaton Country Naturals (8 ply/DK instead of 10 ply/worsted, so gauge test was unavoidable), which is pretty much my go-to yarn for male knits.

Our friends had a gorgeous baby boy on Christmas Day, so I dug out my Old Faithful Sirdar children's knits pattern book and made my favourite basic V neck. The neck looks small here, I know, but it stretches over a grapefruit with room to spare. (Don't ask.) This was in Bendigo Classic 8 ply, and was actually from stash. Woo hoo!


My brother-in-law- and his partner had a baby boy in late November, and since they live in Darwin there didn't seem to be much point in knitting anything! I hadn't done any quilting for years, and even then it was pretty basic, so I kept this simple too.


The batting (is that what it's called??) is a cotton, so it's really lightweight and breathes nicely. Plus it's not bulky at all, which is a plus since they travel around a lot. It'll probably be more use as a playmat, but it's a good size for that. It's all machine done except for the bound edges at the back. I don't remember ever machine quilting before, and I'm glad this was relatively thin, because it got tricky in the middle there. A few lines show up some uneven stitch lengths, but I'm pretty sure only a proper quilter would notice that. I got a look from my husband when I asked him, so I'll take that as a yes!


It took a bit longer than I thought it would (blind optimism fails me yet again...) but I enjoyed it. I'm not ready to become a regular quilter any time soon - although I'd like someday to make one for our bed - but it made for a nice change. Thank goodness for rotary cutters, though!

I don't often share much outside sewing/knitting ventures, but I hope you don't mind me being a wee bit self-indulgent for a moment and sharing The Best Christmas Present Ever:


Introducing Sasha. We're all in love...

This first post of the year is also my first blogiversary! I thought I'd commemorate it first by saying an enormous and heartfelt thank you to you all. It's been such a rewarding year, and I've loved being part of this amazing online community. Thank you for all your lovely comments, support and encouragement; it's been so appreciated!

I've been going through my small stash as I've been planning projects for this year, and found a few items that, while I still love them, just don't fit in with the plans. So I wondered whether any of these could find a willing home among any of you? A slightly more tangible thank you, perhaps!

Firstly, a Japanese cotton lawn. This is 112cm (44") wide, and 3 metres (ummm...120" - I don't know yards!) long. It's a navy nackground, with a teal-green, lemon and cream print.


Secondly, a cotton (I'm pretty sure) navy gingham, with 2.5cm / 1" squares. This is 118cm /48" wide and there's just over 2 metres in length.


Thirdly, three skeins of Abuelita Baby Merino Lace yarn. Each skein is 420 yards / 384 metres. This, I'm assured, is fingering weight (4 ply) merino not lace weight despite the name. It's beautifully soft, and I was utterly seduced by it when I saw it on sale 2 years ago - so much so that I ignored the fact that I just don't wear this colour.... Your gain, perhaps!


If any of these take your fancy, leave a comment saying which one(s) and your email address so I can contact you. If there's additional interest I'll draw names out of a hat. Or maybe I'll get Sasha to... ;)

Finally, not as a giveaway, but just because I love it and wanted to Show and Tell - look what my sister gave me for Christmas - the most wonderful tape measure I've ever seen! On the back are these fantastic little drawings of the predominant fashion silhouette decade by decade from 1700 to 1990. It's almost too good to use!


Have a wonderful week :)

Danielle oxo

Wednesday, October 30, 2013

Inspired By: An Origami-ish Elisalotte and a Floaty Girly Frock

Well, it HAS been a while since I was last posting here! But I finally have something I'm allowed to show - some wedding-related sewing. Not THE wedding sewing, sorry - that'll have to wait till after the big day this weekend. But as of last Saturday it's all finished and packed off to the bridal party...which gave me a brief window of time to put together some dresses for my girl and me.

This was my original plan for my dress:


I still love it, and fully intend to make it some day, but just couldn't find any emerald lace that I liked. And I'm really not confident enough with dyeing (i.e. have never even attempted) to get around it in that way. Plus, I have to admit that given the acres and acres of chiffon that I've been sewing, the idea of something structured in a fabric that stayed put and did what it was told was mighty appealing! Since time was fast running out I went back through my 'dresses' Pinterest board and decided on this one:


...Mainly because of that two-tone origami-ish bow. Love. I'd just bought By Hand London's Elisalex dress and Charlotte skirt patterns, and thought that the Elisalotte combination would work nicely for this.Once I chopped off some length, that is. (Am I just short, or are the patterns drafted for the statuesque? Actually the answer to both is probably 'yes'...) I wasn't too interested in replicating the lines of the bodice above - I actually prefer the softer curves of the Elisalex anyway. A flying trip to Melbourne netted me some pretty sumptuous shot silk dupion in lavender and aubergine.And here tis!


I hadn't ever tried sewing with this fabric before - it was interesting! Almost like sewing flexible paper, or very thin sheets of aluminium foil. At first I was worried that it was a bit too light-weight for a structured dress like this. But it holds its shapes amazingly - in fact at times it was actually a bit like sculpting. And I think I would have struggled with a heavier fabric, say a delustred satin, when it came to doing the front bow; I think it would have become very bulky very quickly. As it is, the silk sits nice and flat against the main dress - and folds stay exactly where you put them!


 I feel a bit like I'm channeling my inner Barbie, but hey, there's a time and place for that :) And it really feels wonderful on. Back view for Nessa below :) (Must watch my posture in future...) The lower scooped back is possibly my favourite feature of Elisalex.


From the inspiration picture, I worked out that there was one main bow which had the ties originating from the side seams at the waist. Then there's a second piece - imagine a capital T shape with a wide trunk that narrows diagonally each side to the base. The ends of the T's upper crossbar are also sewn into side seams, but underneath the main bow's ties. The "trunk" is folded up concertina-style and slipped through the loop that forms the knot of the main bow. Confusing? Yes. In the end, I didn't have enough fabric to do that "T" shape anyhow (only bought a metre of each colour) so had to adapt. I ended up instead with just the "trunk" - see below:


I folded this and slipped it through the knot and then positioned it where I wanted it. I swear, it really is like sculpting, it doesn't move unless you make it move! I did do a few hand stitches in a couple of places, just to be sure it would absolutely stay in place when worn all day.


I do wish I could have gotten some nicer lining (this is just bemsilk), but I kind of spent all my money on the main fabric....


This last shot gives a much better idea of the bodice fabric's colou. It looks a bit washed out in those outdoor photos. And honestly, could these two patterns go together any more beautifully?! (Pretty proud of that invisible zip work there, too.)


So that's me set for Saturday! But I'd also promised my girl a new dress, and she asked if I'd make her one. I said I would....right before she asked - apologetically - if it could be made of chiffon. (She may have overheard some chiffon-based ranting once or twice.) I stifled my urge to shriek "Dear God, no!!!" to the heavens, and we had us a look at Pinterest. Almost immediately, she found this:


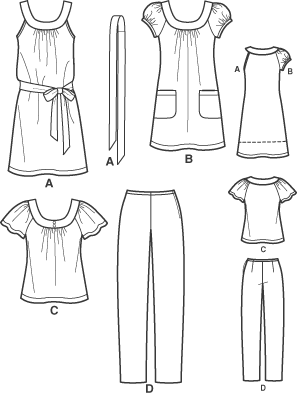
Being twelve, she thought the colour was boring, so requested aqua instead. And she wanted the flowers going right around the neckline/yoke. I had a fossick through my patterns and found New Look 6785, which I'd never even used. I think I got it in one of those 3 for 1 sales once upon a time:

Look at View A! Done, and done. It really was just a matter of making sure the yoke wasn't gapey - I had to take it up at the shoulders about 1", and pinch 2cm out of the front fold. I made the chiffon layer of the front and back as wide as the fabric itself (115cm) and cut it out the length of View B. She's pretty happy with it!


I wasn't much looking forward to making the fabric flowers - I'm really, really tired! - but then I remembered that Kaisercraft, who I work for, sells lengths of these chiffon ribbon roses:


Yay, and hooray! Happy girl, and happy me. And I can't tell you how wonderful it was to have a quick project after the past four months - this was Saturday evening and Sunday morning before church. Win!

Now, assuming there's no eleventh hour problem with the wedding party dresses (rationally I know there won't be, but I don't think I'll fully relax until they've all made it down the aisle), I can put the machine away and reclaim my dining table....

I plan to do the Wedding Post on Sunday. If I'm not asleep, that is...

Have a wonderful week :)

Danielle oxo

Friday, September 20, 2013

Some Ugly And Unselfish Sewing

Hello! A quick word of warning before we begin: if you're looking for a glamour fix, this is not the post for you. In fact, this may be the ugliest sewing project I've ever done! But it also may be one of the most appreciated, which is why I'm dedicating a post to it.

As any Australian will know, and especially any Victorian, September is Footy Finals Month. And if you're not into footy....well, tough! It's everywhere. The rest of my family are diehard Geelong Cats supporters (Except for one son, who now barracks for Hawthorn. Suffice it to say, Gary Ablett's departure cut deep). Today at their school, where my man also teaches, was Come Dressed In Your Team's Colours Day (or something less wordy), and my man and my girl both wanted a Geelong onesie to wear.

Now normally I don't really condone onesies for anyone over the age of, oh, eighteen months or so. But it would seem that in the name of Team Support, all such rules go out the window. Plus, after a few weeks of wedding sewing, I think I was ready to sew something frivolous!

I used an old pattern that used to belong to my mum - Simplicity 9810. I've no idea whether it's still in print or not, but it's an animal suit pattern. I ignored the hood-with-ear-options, feet and mitten pieces, and just cut bands of the same fabric. If I'd left myself enough time I would have maybe narrowed arms and leg cuffs, but Blind Optimism plus Night Before didn't leave any room for finessing... I'm not too concerned, although I wouldn't mind fixing up the neckbands a bit; I think they'd look better if they curved down at the opening to meet the front zip. I only got one shot of the front view (including a third, grumpy supporter - no time for face-painting, I'm afraid, and blue hair was only a part consolation.):


And that's because these onesies are all about the back! (There you are, Nessa!)


I'm pretty happy with the way those logos turned out. Since I don't know how to screenprint, and can't embroider on my machine, I went with a kind of applique. I have no idea whether this is an official technique, but it works, so that makes it valid in my book :)  On the very slight chance that anyone will someday want to reproduce a logo/image, and be in the same (lack of skills) boat as me, here's how I did it:

Print out logo onto A3 sheet.


Pin contrast fabric to pattern piece (here, the back) with paper template pinned over the top.
(NB. Unlike me, do this before you sew any other pieces together, eg. sleeves, fronts. Seriously.)


Machine sew along outlines. Stop and swivel/reposition fabric as necessary. (This is time-consuming, awkward and fiddly. Be aware you will probably gouge yourself on the pins repeatedly) 


 Once all outlines have been sewn over, carefully tear away the paper. Then, using very fine scissors - small embroidery scissors with sharp outlines worked beautifully - cut away the sections that should be the background colour. I found it easier to cut chunks away, then go back and do a finer, closer cut afterwards. (No photos of these two steps, sorry. I can only beg the excuse that it was 2am by this stage. I haven't done 2am for a very, very long time.)

The end result comes out like this:


And a close up:


So long as the contrast fabric doesn't fray, you can get in really close to the stitching without any worries. Like I said, it may not be an official technique, but it does do away with cutting out lots of tiny shapes and trying to position them ...I can remember the misery of that from Year 8 Textiles!

They really are ugly, there's no denying it! But, both are being worn right this minute in the other room to cheer on Geelong in the Preliminary Final. (Against Hawthorn, so it's going to end in tears for one family member at least...) I keep hearing howls of outrage / yells of jubilation from the other room as I'm typing this... I kind of wish I'd made them earlier in the season now! Never mind, I'm pretty sure they'll get plenty of wear in years to come :)

For anyone not interested in sport-related sewing - if you're still with me - look (look!!) what I just got in the mail from Sarah at Fabric Tragic! I won one of her giveaways ( the day after my birthday - how's that for timing!), and just unwrapped this bundle of wonderfulness:


It was really too dark to take proper individual photos of each piece, so this is just a being-excited taster. I'll post some proper pics once I have some daylight to go by. But in the meantime, have you ever seen anything more fabulous than those glow-in-the-dark knitting needles?? I think not :)

What are you working on at the moment? Any frivolous projects in the pipeline?

Have a wonderful week :)

Danielle  oxo