Saturday, December 21, 2013

Complete: Giveaway Dress

Hello again :) Hope you're enjoying the festive season in your particular area of the world. My December seems to be calming down a bit now, thank goodness...and now I'm officially on holidays I'm hoping to get stuck into my projects pile. Major holiday goal: to make a wearable pair of shorts. Actually I have fabric for three different pairs, so I'm hoping all the wonderful reviews of Pattern Runway's Scalloped Shorts prove true in my case. (I'll keep you posted)

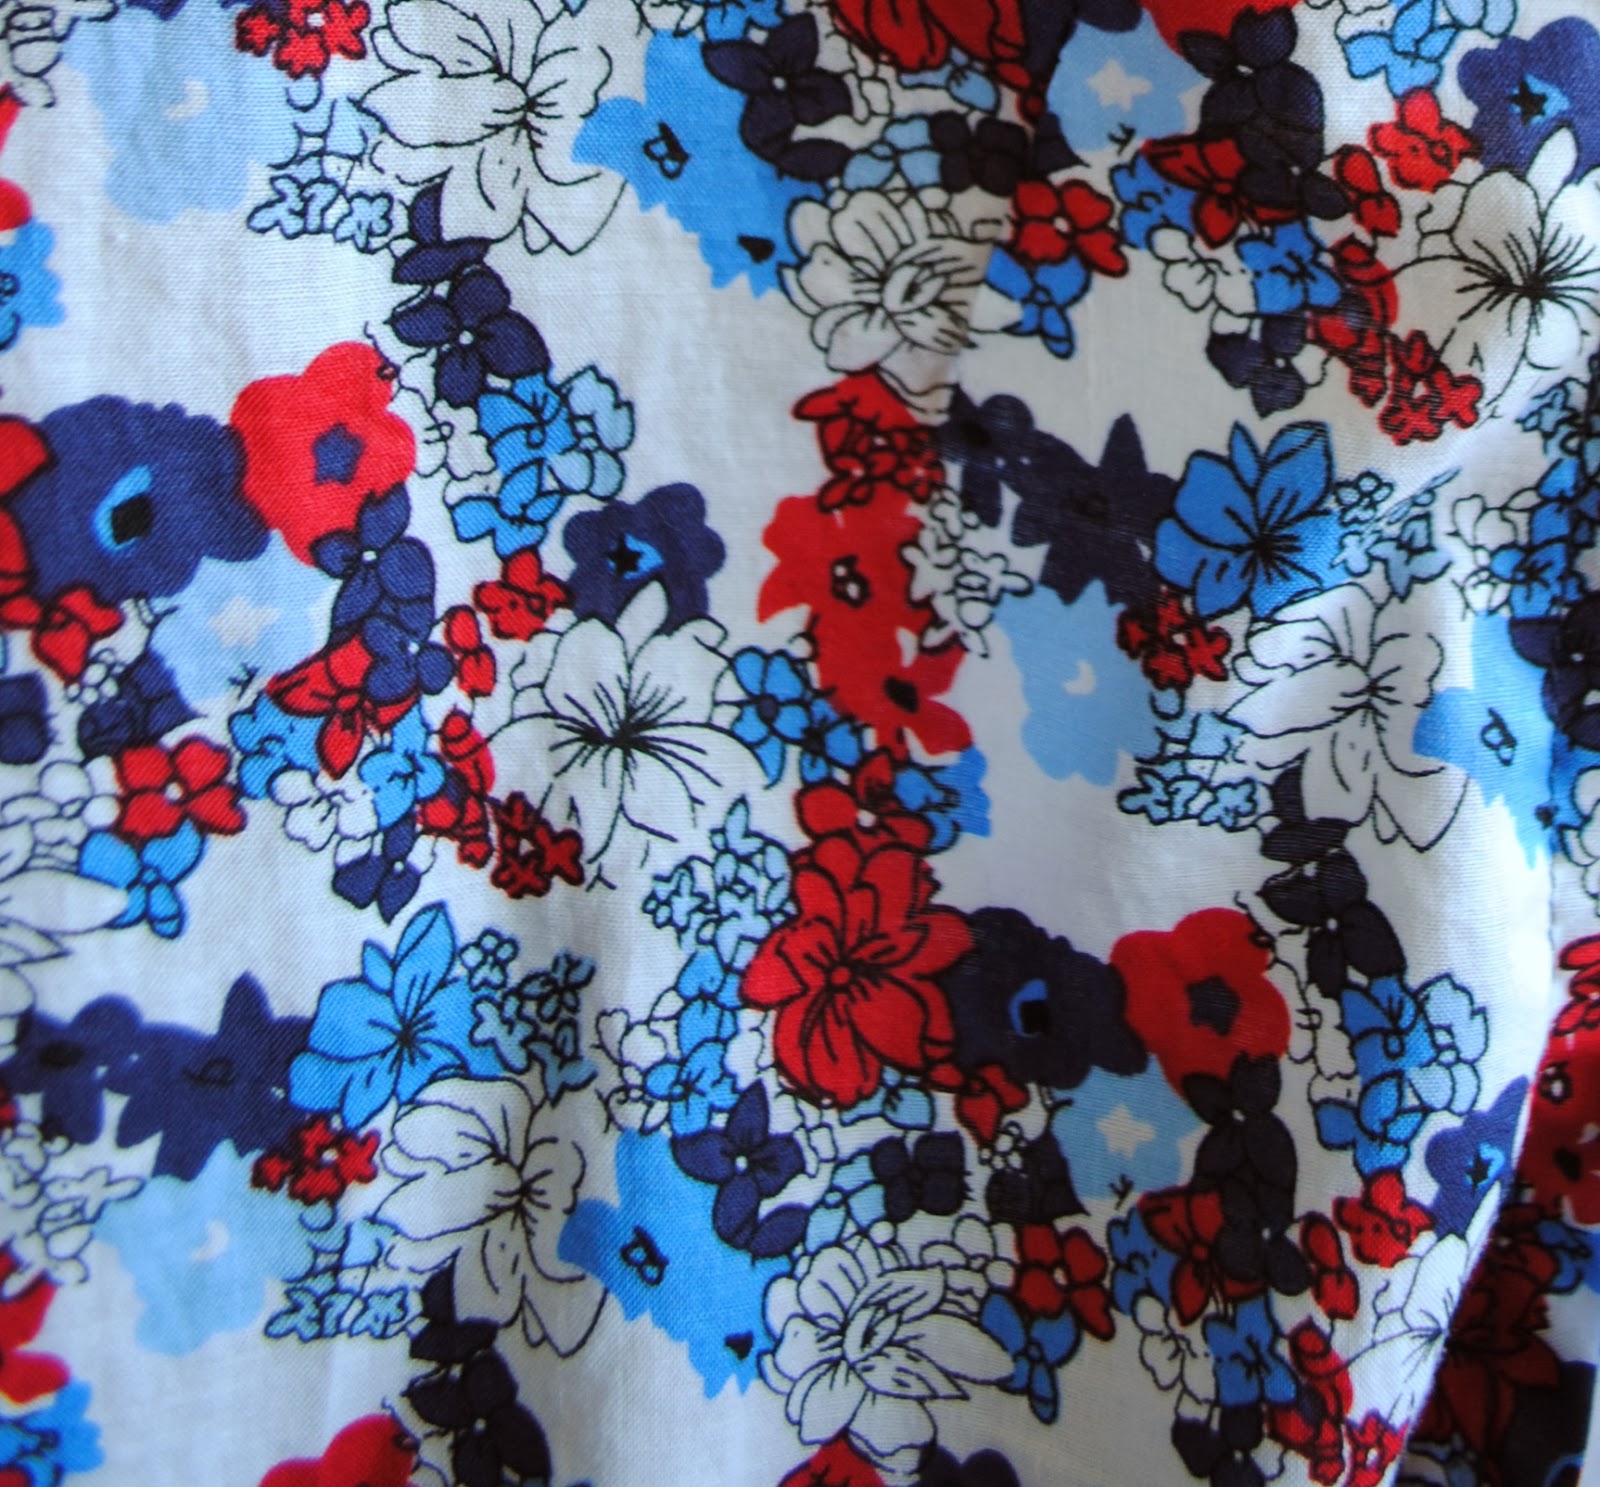
Before that though, here's my latest make: my Giveaway Dress. I'm calling it that because I won both the fabric and the pattern, along with lots of other goodies, in Sarah of Fabric Tragic's giveaway earlier this year. This fabric was the main reason I entered. I love its slightly retro feel, and to me it was a perfect match for the shirt dress pattern that came with it. Oh, I do love a good shirt dress!


Slightly dodgy, last minute, night time photo there, sorry. Navy, red and white always suggest summer to me - maybe it's that nautical connection - so I decided to do without the sleeves and finish the armholes with self bias binding. There was a generous three metres of fabric, but even so I only just had enough. There's quite a bit of fabric needed for the skirt - it's not a circle skirt, but it's not far off. Plus even though it looks random, the pattern is actually repeated; there's a fairly strong diagonal "line" happening there. I matched it up fairly well on the skirt, but miscalculated somewhere along the line with the front pieces; you can see that the red "Ls" (for want of a better term!) are bit off along the centre front. Still, I can live with that. If anyone points it out I can just tell them to stop staring at my chest...


Would you believe it? The bodice fit perfectly straight from the pattern! Hurrah for low-maintenance patterns :) You can see from the pattern envelope it blouses at the waist a bit when belted, but there wasn't quite enough fabric leftover to do the matching tie. I'm fine with that though; I can always add a belt. And it's really comfy like this. I did take it in a bit under the arms ( about 1.5cm I think), and I took the shoulders back by 4cm, but that was just to make it sit well without the sleeves.


I also took 1.5cm off the width of the collar. It's still substantial, but it's a bit less obviously "of it's time" now. They did like them big in the seventies, didn't they!

I've decided I really like the seventies' aesthetic. I haven't sewn many vintage patterns, but I think I may have found my decade :) I always thought it was the forties, so there you go! Thanks, Sarah ;)

One thing I really like about this pattern is the fit of the back. Like I said I'm no expert at vintage patterns but all the ones I have sewn seem to have little fit-related details that you don't typically see on modern patterns. This one had shoulder darts at the back, and I love how nicely that shapes the bodice. 


  The other "vintagey" detail I liked (but didn't actually do since I would've run out of fabric) was the generous hem allowance - 7.5cm / 3". Does anyone know why that was done? Does it make the hem sit more nicely, or help the skirt hang better? I'm curious...

The only other modification I made was to add pockets into the side seams. Because a summer dress absolutely needs pockets.

I'll definitely make this again sometime, perhaps in something a bit drapier like rayon or silk. And I very much like the contrast collar in the example. In the meantime, this version will be getting a lot of use. It makes me feel like going on a picnic, or on a beach walk....in short, it's an ideal summer dress!

Before I get started on my shorts I have a bit of unselfish sewing and knitting to do. Several family members have December birthdays, and the baby quilt for my nephew is well overdue. Not too much more to go, happily.

Are you sewing/knitting any gifts this year? Hope they're all going smoothly... and quickly!

Have a truly wonderful Christmas and festive season,

Danielle oxo


Saturday, December 14, 2013

Complete: Style Arc Rowe Top ( & Rowe Top...& Rowe Top...)

Hello all! I'm grabbing the first spare hour I've had in over a week to sit and post - honestly, December this year is feeling like a massive To-Do list. I think I'm usually pretty good at keeping things fairly relaxed over the festive season, but I've gotten right out of whack this time :/  Must remember for next year ... simplify!

I do have some big (for me) news though - I have made friends with knits! I've been genuinely intimidated by the notion of knit fabric for "ordinary" clothes. Even though I've made plenty of costumes using knits, I didn't really think I could achieve a nice, professional-looking finish on everyday wear. So even though I cut this pattern out back in - wait for it - May, it sat on the desk until two weeks ago. (Yup, this was one of the four projects I pledged to make for MMM. Oops.)

Two weeks ago though I decided it was ridiculous to be defeated by fabric and had a go. And in doing so I discovered my new favourite pattern! This is Style Arc's Rowe Top / Tunic. (I'm having trouble linking to it, but googling that should take you straight there :) ). I've been wanting a slouchy tee for a while, but a lot of the RTW ones I've tried on are very boxy, which is a look I really like - but only on other people. Also, a lot of them seem to gape at the neck, and I wanted something comfy I could move in without having to constantly glance down and check on.


It's nice and slouchy, but has a nice shape at the sides ( not that you can really tell on the hanger...) And I'm not sure how the fine folks at SA did it, but the neckline sits flat at all times. Hurrah! This was straight from the pattern with no modifications.


You know when you tell yourself you're only making a muslin, but you're actually really hoping it turns out to be a proper wearable garment? Here 'tis :)

The sleeves are finished with bands of the same fabric, which makes for a really nice finish.The only change I'd make from now on, and this is purely personal preference, would be to take a bit of volume out of the sleeve hem. 4cm / 1 1/2" would be just about perfect.


I like the design line on the back; I think it's a nice little added feature. Plus, it would lend itself to colour-blocking very nicely.


I had a bit of trouble getting a smooth stitching line at first - as you can see on that back seam above. But what I was more worried about was getting the hemline to look right (you know, not "homemade"). This was the main intimidation factor, after all! But my machine's instruction manual had this strange, random-sounding little tip that I'd never heard of before: If stitching line is not smooth, sew with a sheet of paper underneath.


I gave it a go, even though it sounded a bit like some editor was bored and having a laugh. You know what? It works! Below you can see the one of the first practice pieces lying over the top of the sewn-to-paper piece:


Who'd have thunk it! Mind you, I'd also like to add that you need to be very careful as you're tearing the paper away afterwards...One side at a time works best I found :)

A few months after I cut that one out I bought a beautiful remnant of a neutral coloured wool jersey (about 1.5m, I think). I bought it with this pattern in mind, hoping that one day I'd actually be brave enough to attempt it. Then I happened to notice that colour-wise it worked quite well with the sequin fabric I made my last post's Festive Skirt out of. I'm trying to get a bit more creative with leftover project scraps - I really hate waste - so I experimented a little. And I think it worked!


 From memory, the sleeves are 5cm / 2" shorter than the pattern, and hemmed rather than finished with the bands. I also combined the upper and lower back pieces into one pattern piece. This is easy - just match up notches and make sure the seam lines are laid on top of each other, rather than laying the pattern pieces edge to edge:


I generally cut out pattern pieces pretty frugally (a legacy of years of costuming on minimal budgets!), so once I'd done the one above I thought I just might be able to squeeze another top out of what was left over. This fabric is so soft and fine and warm, that it seemed a shame not to have a long sleeved top for winter out of it... And, as luck would have it, there was a post I'd read by Grainline a few days earlier that explained how to convert a short sleeved pattern into a long sleeved one. There was just enough to make it work!


There's probably a bit too much volume in the lower arm; I could have graded it in a bit so it was more noticeably 'batwing". And in a perfect world, I would have finished off the hem with a band also. But these are pretty small niggles overall, especially given I got my two tops out of one remnant!

So there you have it; my new go-to comfy pattern! Don't you just love accommodating patterns??

Do you have any "blank canvas" dependables like this one? Or any more tips for sewing with knits? Do share!

Have a wonderful week :)

Danielle oxo


Sunday, December 1, 2013

Inspired By: Festive Sewing

Hello and Happy December to you all! Since Christmas parties, work break ups and the like are just around the corner, I've been thinking Festive Sewing lately. After all, given my RTW ban this year, if I want something new I've got to DIY it. So I have!

Going back over my Pinterest boards I noticed I've pinned rather a lot of versions of these sequinned skirts:


Sequins are not really the kind of fabric I usually gravitate towards, but I really like the way this is "festive" without being too glitzy.... sequins for the introvert, if you like!

Then I found some fabric at Spotlight that I loved - a kind of muted bronze - and that decided it. I had some black silk chiffon that I thought would work as a sleeveless Style Arc Tiffany Blouse to go with it, but in the end I really wanted a top with a higher neckline to go with a mini (though not quite as mini as above!). Plus, to be completely honest, I couldn't face the thought of sewing chiffon just yet....

So instead I went with the Laurie Tee from Named Patterns. I've been wanting to try their designs since I saw them, so it was a good excuse!


At first I'd planned to use BHL's Charlotte Skirt pattern and lop off some length. But then I found New Look 6107 in amongst my patterns and thought its lower waistline and fewer darts might work better.

I already had a similarly coloured stable knit in my stash which I used to underline the sequins, since it's quite drapey and I wanted a more structured look. I used a lightweight fuse in the waistband, but I think if I ever make another I think I'd use something finer still; the seams got quite bulky.


I finished the inside seams with a zigzag stitch, but the hem I covered in wide organza ribbon folded in half and then stitched it down by hand. The raw edges where the sequins are cut are quite scratchy and I thought that the organza might give any tights I wear a fighting chance!


Now I'm not claiming to be an expert at all after one skirt, but just in case someone out there finds it useful, here are my thoughts on sewing sequinned fabric:

1.  Pick a pattern with as few seams as possible! There's no disguising seams or making them subtle - keep it simple :)

2.  Don't skimp on the basting if you underline it. Really. Do more than you think you need - it's worth it to have fabric that doesn't slip around or apart when you come to machine it. I found it really helpful to baste around the darts too.

3.  This didn't seem to be an issue with this particular fabric because the sequins are so tiny (see below), but for most of the other fabrics I saw I think it would be wise (and kinder on your machine and needle) to remove sequins along the seam lines. I've had to do that with beaded fabrics in the past, and I think most sequin fabric might require similar treatment. (I kind of wish I'd removed all of the sequins from all seam allowances in order to "de-bulk" the seams too) In which case...

4.  ....save all the removed sequins to hand sew back on once seams are sewn. Dull but again worth it.

5.  A longer stitch length seems to give a smoother finish. I used the 3 1/4 setting on my machine.

6.  Hand finish wherever possible!


I'm sure that's not a comprehensive list, but those are my discoveries anyhow. :)

On to the top. This probably shouldn't have worked - which is no comment at all on the pattern, believe me! It's drafted for knit fabrics, and this is a woven with a little bit of spandex thrown in. I couldn't find any knits that were fine enough for the blousey look I wanted. So I got this, hoping that since it's a looser fit the lesser stretch wouldn't be too much of an issue. And it wasn't - in the body. But the neck...well, let's just say I'll be doing hair and makeup after I've got it on! I cut the neckband piece on the bias, and that's the only reason I can get it on at all.


You can see that even with the bias cut, I've stretched it a little getting it on and off...


The only modifications I made to the pattern was to shape it at the sides a bit. I'll probably only ever wear it tucked in, but just in case I do wear it out I need a bit of shape for flattery. Boxy cuts don't really work on me. It's a great pattern though, and has definitely whetted my appetite to try more Named designs.

I've had a bit of a think about how else I can wear the skirt; I'm really trying to get a bit more adventurous when it comes to styling. I think it'll work for winter, with opaque tights and a cropped jumper/sweater. And I think, under certain circumstances, it could be dressed down with a slouchy tee, sandals and a denim jacket. Or it could work with a cardi, or a white shirt, or singlet top. It's actually more versatile than I first thought!

But, I have two questions that I'd love some advice on:

1: All my choices above work I think, but are pretty "safe" colour combinations. What colour or colours would you pair with bronze?

and 2:  How on earth do you wash/clean/ care for sequins??

Any advice would be much appreciated!

Have a wonderful week :)

Danielle oxo


Monday, November 25, 2013

How Do You Define a Fail?

First of all, I just wanted to thank everyone who took the time to comment on my last post; I was so touched by all your kind words.The online sewing community is amazing! Thank you all, it was very much appreciated :)

Lest anyone worry that the compliments may have gone to my head, you can rest assured that you needn't: welcome to my latest fail! I finally finished my poor, neglected Cozy Cardi. After all the high octane wedding sewing it was blissful to sit and knit for a while instead. Here 'tis:


 It's a Cleckheaton pattern, but I've been hunting through Ravelry and can't find any links, sorry. I first saw it in a Cleckheaton book that seemed to be a collection of several earlier booklets of theirs, but found it later in a magazine (which was about a quarter of the price :) ) I loved the colours in the example so didn't change a thing on that score. Although I did use Bendigo Rustic 12 ply instead, because it's one of my favourite bulky yarns, being wonderful quality and almost ridiculously economical. There's also an optional tie / belt:


I really loved the stripe detail, which wasn't complicated to do at all, just 3 rows garter stitch, a row of yarn overs and purl 2 togethers, then 2 more garter. It gave it a wonderful texture overall. And I LOVE a shawl collar - so divinely cozy! I did make a bit of a hash of the buttonholes (including doing an extra one..), but I'll chalk that up to post-wedding catatonia...


My least favourite bit? Weaving in the ends - so many! Below are the offcuts...


So why call it a fail? Well, because when I tried it on it was unwearable! And it's entirely my own fault since I didn't bother knitting a gauge swatch first....Stupid blind optimism.The sleeves actually come down to my knees. Sadly, because I'm so lazy about gauge this isn't the first time this has happened - when my husband tried on the first jumper I ever knitted for him, he said, "I really appreciate all the time you've spent on this, but I've been in tents that are smaller than this..." It was a fair call, honestly!

Depending on how you define "fail", this qualifies. BUT I found a way to salvage it! It now belongs to a dear friend and is very much appreciated. So I guess all's well that ends well, huh?

I've also finished a project that was actually intended to be a gift. A Winter Trails beanie in The Fibre Company's Organik. Another friend has just started a course of chemotherapy, and I thought this might be nice to have on hand for those "can't be bothered" kind of days. Especially since even though it's late November we've hardly had a taste of Spring yet...


I got a bit worried towards the end, but there was just enough yarn in the end, with not quite a metre left. It's the second Winter Trails I've done, and it's amazing how much easier a pattern is the second time around! My camera still seems to bring out cooler tones rather than warmer ones, so the colour here is not quite as it is in real life - it's a soft grey-brown (I've heard that shade called "donkey", I think), called Claystone.


On the sewing front, I've been getting a lot of projects cut out and ready to go (the worst bit!), so that when I get any spare time I can get on with the fun part. Next up is some Festive/Christmas party style sewing...

And in any other spare time that I might find I'll be branching out briefly into quilting! I have a new baby nephew, and since he lives in Darwin I'm not sure he'll be needing much in the way of woollens. So a quilt it will be. A very, very basic one! With turtles and greens and aquas:


Still a long way to go yet, but I've got a month before they travel down for Christmas. Here's hoping it works!

Have a wonderful week :)

Danielle oxo

Tuesday, November 5, 2013

Complete! Wedding Sewing

'Tis done, 'tis finished, 'tis finished, 'tis done! Yup, the wedding has been and gone, and this is the first night I've been able to keep my eyes open long enough to actually post about it. I didn't realise how nervous I was about something going wrong (that was my fault) until the morning itself. The bride said I could come and take some photos beforehand while the photographers were doing their thing, and I was actually shaking as I knocked on the door! Evidently I'm not a good candidate for ever doing this kind of thing professionally :)

I think the best moment for me was seeing her for the first time - I didn't recognise the dress! I just saw her, and she was radiant. I figure that's a sign I did my job properly :) So, here 'tis:


Silk chiffon skirt over satin backed crepe and chantilly lace over the bodice.


We did the back as a cut out, with a zip as the lower back fastening and buttons at the neck.


A fairly rubbish "back" shot taken on my phone after I realised I hadn't taken a proper one earlier...


We used Salme Patterns' Sleeveless Yoke Top as a starting point. The pattern has the yoke as a separate sheer piece, sewn into the sweetheart bodice. I did an overlay of fine tulle instead, that I could sew the lace to (will explain in a moment). I lowered the back bodice almost to the waist seam and used the tulle for the upper back sections.


This was because the part of the lace that she really loved was the exquisite edging, while the main fabric, though lovely, wasn't really what she wanted. This meant quite a lot of fairly painstaking cutting out. (She pitched in with this, so we called the dress a joint effort ;) ) Below is the section allocated to sleeves - there was a LOT more!


Because we were working with more or less straight lines of fabric now, it meant I couldn't just cut out bodice-shaped pieces. So the bodice was formed from two long pieces, that started from one zip edge at back and encircled the bodice, ending back at the zip, one piece edging the upper bodice and the other edging the waist. (does that make sense??) The shallower scallops were the outer edges, though we trimmed them off at the decolletage.

So far so good. But, as you can imagine, once it was handsewn down at upper bodice and waist, there was a lot of fabric flapping about in between. I got around that by snipping away excess between main motifs, and then layering them to sit flat. You can see in the shots below firstly the pinned section, sitting flat against the bodice (already sewn down) and some "flappy" excess. The second shot shows that excess cut away, ready for layering.


The main trick was keeping each side symmetrical.... Got there in the end though! The really fiddly part was the upper back sections (see third photo above). The scalloped lace edging needed to be along that diagonal line from below the arms to the neck. This is where the tulle overlay was so helpful. Lots of tiny stitches (yup,  it's all still hand-sewing here...) meant I could manipulate it gradually into shape. And I managed to use those deeper scallops from the inner cut part of the edging as the upper neck, over the shoulders and down to meet the front at the bust. The cap sleeves used the outer scalloped edging also, and were sewn into place.

The main skirt was just a bit fuller than A-line; there were talks about whether to make it stand out wider (Helen, I was reading up on your petticoat notes at this point :) ) but in the end she decided she really wanted a soft fall to it. And a train.Which I totally sympathise with - when else do you get to have a train, after all? I think the chiffon overskirt had about 2 1/2 times the fullness, but I can't remember for sure. I do know that handsewing the narrow rolled hem took a freakin' long time...( But when my girl, who's only 12, looked at the machined practice hem and the hand-done practice hem she said, "You really want it to be the nicest it can be..." Touche.)

Something New? Dress. Something Borrowed? Veil. Something Old? Some absolutely beautiful vintage glass buttons. I'm told they're originally from the 1920s. Love....


Does anyone know how to sew buttonholes on extremely fine lace? I don't, so had to improvise. Since we had the last bit of lace from the bolt, there was a narrow selvedge edge. I pinned and basted this to the back of the lace and sewed the buttonhole (Practice piece below). This gave it enough stability to prevent it getting chewed up in the machine. Once done, I trimmed the excess away as closely to the stitching as I could manage. (Embroidery scissors have been my saving grace during this project!). It worked - and was pretty much invisible from the front.


The Something Blue may be my favourite part of the whole dress. And nobody saw it! So I'm going to share it here. I nearly did it as a surprise, but then it occurred to me that a wedding dress probably shouldn't be experimented on. So I checked, got a "yes! yes! yes!" from the bride, and went ahead. The Something Blue was the lyrics to the song they had during the ceremony, embroidered on to the bodice lining. Isn't it nice when what you see working in your head actually works in real life!


And now to the Bridesmaids. And to why I know I'll never be one of the top sewing bloggers. Even though I went to the house prior to the ceremony in order to get close up photos and detail shots, THESE ARE THE ONLY TWO I TOOK OF THE BRIDESMAIDS. Just got too caught up in the emotion and excitement, I'm afraid! Or maybe all those years of Aaron suggesting I put the camera down and start actually enjoying the moment rather than recording it are starting to bear fruit. Never mind, here they are:


Again, I didn't do a separate piece for the yoke; it's a full overlay. This was because the fabric used underneath the chiffon was different for each dress. The "under" fabric surprised me as we were choosing it, because fabrics that at first looked like an obvious match to the chiffon (which was picked first), would often alter the colour of the chiffon over the top - sometimes startlingly. So in the end we choose the under fabric according to how it "disappeared" under the chiffon. So the lemon dress is cream underneath, the lavender is blue, while the mint one is almost silver grey. And thus, we needed a full overlay!

Please, please notice the chiffon bias binding at the neck, shoulders and back opening. That's probably the most fiddly, time-consuming sewing I've ever done. And I shall die a happy woman if I never have to again...
Isn't it a good thing that french seams look so lovely, given how much extra work they can be? I was really reproaching myself over how long the skirts were taking me at the time. But then I worked out, that if there are four dresses, with three skirts on each, with each skirt having six seams, and each seam having to be sewn twice to be french, that's a grand total of 144 seams. (Really : 4 x 3 = 12, 12 x 6 =72, 72 x 2 = 144). I went easier on myself after that. And one good thing - after handsewing the bride's chiffon hem, these ones seemed to be done in a snap! Well, snappish...

So there you have it - my last four months! Thank you to all of you who've left encouraging and supportive comments along the way - I've appreciated your kindness so much. I think it's time for some selfish sewing now. My queued for-me project list is getting out of control...

Oh, and by the way, there was a groom at the wedding too ;)


Have a wonderful week :)

Danielle oxo